Thursday, February 21, 2013

Add transparent theme to activity


In manifest

<activity

      . . . .  .
    android:theme="@android:style/Theme.Translucent.NoTitleBar.Fullscreen"

. . . . . . .
> 
</activity>

How to create a splash screen


public class SplashActivity extends Activity {

                 private static String TAG = SplashActivity.class.getName();
                   private static long SLEEP_TIME = 5;    // Sleep for some time
                                   @Override
                   protected void onCreate(Bundle savedInstanceState) {
                      super.onCreate(savedInstanceState);
                      setContentView(R.layout.activity_splash);
                 
                      // Start timer and launch main activity
                      IntentLauncher launcher = new IntentLauncher();
                      launcher.start();
                   }
                 
                   private class IntentLauncher extends Thread {
                      @Override
                      /**
                       * Sleep for some time and than start new activity.
                       */
                      public void run() {
                         try {
                            // Sleeping
                            Thread.sleep(SLEEP_TIME*1000);
                         } catch (Exception e) {
                            Log.e(TAG, e.getMessage());
                         }
                 
                         // Start main activity
                         Intent intent = new Intent(SplashActivity.this,mainactivity.class);
                         SplashActivity.this.startActivity(intent);
                         SplashActivity.this.finish();
                      }
                   }
}


In manifest

<activity
           . . . . . .
             android:theme="@android:style/Theme.NoTitleBar.Fullscreen"

. . . . . . . . . .
           >
        </activity>

Set editext input type programmatically

edittext1.setInputType(InputType.TYPE_CLASS_NUMBER);

Saturday, January 26, 2013

Create custom dialog :


code:

final Dialog d = new Dialog(myActivity.this);
d.setContentView(R.layout.mylayout);
d.setTitle("my title");
 final EditText edit = (EditText)d.findViewById(R.id.txtedit);
 Button btn = (Button)d.findViewById(R.id.txtbtn);
d.show();

layout:

<Button
        android:id="@+id/btnAdd"
        android:layout_width="fill_parent"
        android:layout_height="wrap_content"
      />

    <EditText
        android:id="@+id/txtItem2"
        android:layout_width="wrap_content"
        android:layout_height="wrap_content"
        android:inputType="text" />

Change color of alertdialog button


 Button b = dialogf.getButton(DialogInterface.BUTTON_NEGATIVE);
if(b != null){
   b.setBackgroundDrawable(getResources().getDrawable(R.drawable.loginbutton));
  b.setTextColor(getResources().getColor(android.R.color.white));
 }

Iterate through array values and insert to sqlite db:


String [] arrayA ={"a","b","c"};
Value[] adst =new Value[arrayA.length];
for( int i = 0; i < arrayA.length; i++)
{
String something = arrayA[i];
   Value dist =new Value();
    dist.setname(something);
     adst[i]=dist;
}

valuedao.insertInTx(adst);

Delete a row from sqlitetable:


 db.delete("Tablename","coloumnname"+"="+valuetocompare,null);


Removing duplicate rows from sqlite table


db.execSQL("delete from TABLENAME where rowid not in (select min(rowid) from TABLENAME group by COLOUMNNAME);");


Count number of rows in a sqlite table

long numRows = DatabaseUtils.queryNumEntries(db,"Table_name");

Get image from sdcard and put in imageview


File imageFile2 =new File(Environment.getExternalStorageDirectory(),"/images/"+imagef2);

      if(imageFile2!=null)
      {
Bitmap bitmap2 = BitmapFactory.decodeFile(imageFile2.getAbsolutePath());
     imageview.setImageBitmap(bitmap2);
      }

Delete image from sdcard:


 File file  =new File(Environment.getExternalStorageDirectory(),yourfilename);
     file.delete();


Populate AlertDialog with CheckBoxes


boolean[] isChecked = null;
final  List<CharSequence> selectedItems = new ArrayList<CharSequence>();
final CharSequence[] others = {"value1","value2", "value3", "value4" };
AlertDialog.Builder buildnew = new AlertDialog.Builder(this);
buildnew .setTitle("Select ");
buildnew .setMultiChoiceItems(others,isChecked, new DialogInterface.OnMultiChoiceClickListener() {
                  public void onClick(DialogInterface dialog, int which, boolean isChecked) {
if(isChecked)
{  selectedItems.add(others[which]);
}

else
                     {
selectedItems.remove(others[which]);
}
StringBuilder stringBuilder = new StringBuilder();

               for(CharSequence item : selectedItems)
           stringBuilder.append(item + ",");
               edittext.setText(stringBuilder.toString());            
}
});
buildnew.setPositiveButton("Done", new DialogInterface.OnClickListener() {
public void onClick(DialogInterface dialog, int which)
                 {
dialog.dismiss();
}
});
buildnew .create();
buildnew .show();

Sunday, January 20, 2013

Create Excel file and store in sdcard


Create an excel file in android :
Download jxl.jar from
extract the file and  copy the jar file to project – libs fiolder


try the following code in your class file
an excel file will be created in sdcard


String Fnamexls="testfile"  + ".xls";
               File sdCard = Environment.getExternalStorageDirectory();
         File directory = new File (sdCard.getAbsolutePath() + "/newfolder");
         directory.mkdirs();
             File file = new File(directory, Fnamexls);

             WorkbookSettings wbSettings = new WorkbookSettings();

             wbSettings.setLocale(new Locale("en", "EN"));

             WritableWorkbook workbook;
             try {
               int a = 1;
                 workbook = Workbook.createWorkbook(file, wbSettings);
                 //workbook.createSheet("Report", 0);
                 WritableSheet sheet = workbook.createSheet("First Sheet", 0);
                 Label label = new Label(0, 2, "SECOND");
                 Label label1 = new Label(0,1,"first");
                 Label label0 = new Label(0,0,"HEADING");
                 Label label3 = new Label(1,0,"Heading2");
                 Label label4 = new Label(1,1,String.valueOf(a));
                 try {
                                  sheet.addCell(label);
                                   sheet.addCell(label1);
                                  sheet.addCell(label0);
                                  sheet.addCell(label4);
                                  sheet.addCell(label3);
                           } catch (RowsExceededException e) {
                                  // TODO Auto-generated catch block
                                  e.printStackTrace();
                           } catch (WriteException e) {
                                  // TODO Auto-generated catch block
                                  e.printStackTrace();
                           }
             

                 workbook.write();
                 try {
                                  workbook.close();
                           } catch (WriteException e) {
                                  // TODO Auto-generated catch block
                                  e.printStackTrace();
                           }
                 //createExcel(excelSheet);
             } catch (IOException e) {
                 // TODO Auto-generated catch block
                 e.printStackTrace();
             }

export sqlite to excel


Export sqlite db to excel:


Open Sqlitedatabrowser
File open database- select ur db file
After it is opened
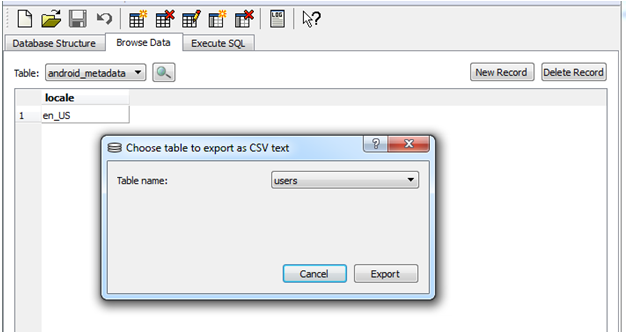
Go to file – export – table as csv file


Export table as csv file

Select table name –click Export
Open excel
Goto file - Open

Select -All files in the right side and choose ur file
Then select Delimited

Next –
Select Comma also as delimiter


Next

Finish
Now you can see the db fields in excel sheet
Now go to file – save as – excel
Thus your db is converted to excel.

Export sqlitedb to excel


download software from this link
  
Select
sqlitedatabase  - in source
db location   - in database
next

Select 
Msexcel – in destination
Location where you want to store the excel sheet   - in database
Next
 

Select all tables

Next
Su bmit
Migration completed message is displayed , just ignore the remaining.
Exit
 now you will find all the tables exported to a single excel sheet.

Convert sqlite to excel


Connect to database:


-Database group – local host
-Next

-Database Name – Select the location of database

-Ready
-Ctrl+shft+C
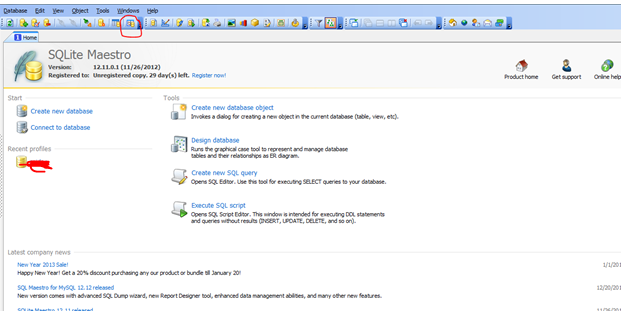
 db will be seen in the recent profiles,Now
Click the object browser(marked in red)
U will find all the tables listed

Right click on the respective table –
Data Management – export data – xcel


Select the format
Export


install apk file to emulator from command line:


first add environment variable (right click computer –properties - advanced settings – environment variable)
PATH – path of adb – (ex:d:\android\platform-tools)

go to command prompt

cd  (adb.exe path)location of adb (ex: cd d:\android\platform-tools )

Adb devices                     – shows list of devices present (emulator which Is active)
Adb install “apk location”       (ex: c:\users\desktop\sample.apk)


General error :
-  failure install failed older sdk
Emulator api level is lesser than the  target api declared in manifest – change it

Editext hint not visible

  If EditText hint is not visible- 


add this
android:ellipsize="start"

Slide-in Animation


slide- in slide out animations for activity transition(left to right):

Intent in = new intetn(this,bactivity);
Startactivity(i);
animateactivity.this.overridePendingTransition(R.anim.slide-in-left,R.anim.slide-out-right);

check if sd card is available:


public static boolean checkStorageAvailability() {
return Environment.getExternalStorageState().equals(Environment.MEDIA_MOUNTED);
}